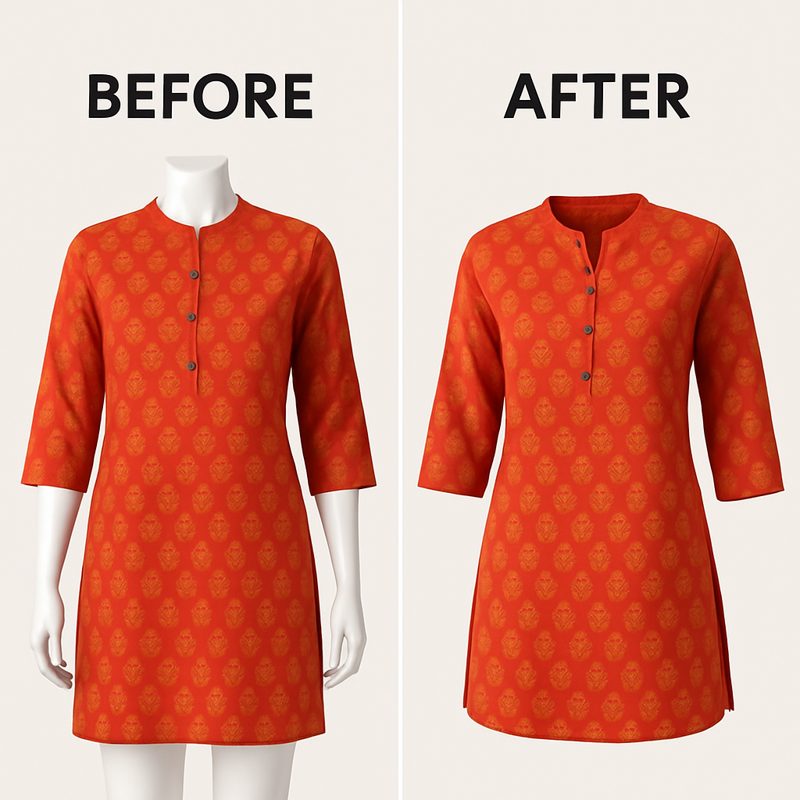
If you sell clothing online, you have seen the ghost mannequin effect everywhere -- on Amazon, ASOS, Myntra, and every major fashion retailer. The garment appears to float in space, shaped as if worn by an invisible person. The neckline curves naturally, the sleeves have dimension, and the body has realistic form. No model. No mannequin. Just the product in three dimensions.
This look is called the ghost mannequin effect, also known as the invisible mannequin effect, hollow man effect, or neck joint service in the photo editing industry. It is the standard presentation format for fashion product photography because it shows the garment's shape and fit without any distraction.
The problem is that creating this effect traditionally is slow, expensive, and requires specialized skills. AI changes that entirely. Here is how the ghost mannequin effect works, why it matters, and how to create it in seconds using CatalogX.
What Is the Ghost Mannequin Effect?
The ghost mannequin effect is a post-production technique that removes the mannequin from a garment photograph while preserving the garment's three-dimensional shape. The result is a product image where the clothing appears to be worn by an invisible person.
This technique goes by several names in the industry:
- Ghost mannequin: The most common term, referring to the invisible form the garment appears to hang on.
- Invisible mannequin: Same concept, emphasizing that the mannequin has been removed from the image.
- Hollow man effect: Describes the empty, three-dimensional shape of the garment as if a person were inside it.
- Neck joint service: A term used by photo editing outsourcing companies, referring to the most technically challenging part of the composite -- joining the inner neckline with the outer garment shot.
- 3D garment photography: A broader term for any product photography that shows clothing in three dimensions rather than flat.
Regardless of the name, the goal is the same: show the customer exactly how a garment looks when worn, without the distraction of a visible model or mannequin. This lets shoppers focus entirely on the product -- its cut, shape, drape, and proportions.
Why Fashion Brands Use Ghost Mannequin Photography
The ghost mannequin effect has become the default for fashion e-commerce for several practical reasons:
- Shows fit and structure: Unlike flat-lay photos, ghost mannequin images reveal how a garment actually sits on a body. Customers can see shoulder width, sleeve length, collar shape, and waistline without guessing.
- No model booking required: Models are expensive, require scheduling, and introduce variability across product lines. Ghost mannequin images keep the focus on the garment and eliminate model-related costs.
- Consistent catalog look: Every product photographed with the ghost mannequin technique has the same clean, uniform appearance. This consistency builds trust and makes browsing easier for customers.
- Marketplace compliance: Amazon, Etsy, Shopify, Flipkart and other marketplaces prefer or require clean product images without distracting elements. Ghost mannequin shots meet these requirements perfectly.
- Faster browsing experience: When every image in a category page follows the same format, customers can quickly scan and compare products without visual noise.
The Traditional Ghost Mannequin Process
Before AI, creating a ghost mannequin image was a multi-step process that required both photography and advanced Photoshop skills. Here is how the traditional workflow operates:
- Shoot the garment on a mannequin: Place the garment on a physical mannequin and photograph it from the front (and optionally the back). Use even lighting and a clean white or gray backdrop.
- Shoot the inside of the garment: Turn the garment partially inside out or fold it to expose the inner neckline, collar label area, and inner seam lines. Photograph these separately. This is critical for filling in the areas that the mannequin occupied.
- Remove the mannequin in Photoshop: Using pen tools and layer masks, carefully cut the mannequin out of the primary shot, leaving only the garment with a transparent interior where the mannequin used to be.
- Composite the inner shots: Place the inner neckline and label area photos behind the outer garment layer, aligning them precisely to create the illusion of depth. This is the "neck joint" step.
- Clean up and refine: Adjust shadows, smooth edges, correct color, and ensure the final composite looks natural. Add a subtle drop shadow if needed to ground the garment.
This entire process takes 20 to 30 minutes per image for a skilled Photoshop editor. For a catalog of 200 products with front and back views, that is 130 to 200 hours of editing work. Even with outsourcing at $2-5 per image, the costs add up fast -- and turnaround times of 24-48 hours slow down your listing speed.
How AI Ghost Mannequin Works with CatalogX
CatalogX eliminates the entire traditional workflow. Instead of shooting on a mannequin and compositing in Photoshop, you upload a single flat-lay photo of your garment and the AI generates a realistic 3D ghost mannequin effect automatically.
Here is the step-by-step process:
- Log in to CatalogX and navigate to the Ghost Mannequin tool under Tools.
- Upload your garment image: This can be a flat-lay photo, a photo on a hanger, or any clear image of the garment. No mannequin required. Supports PNG and JPG up to 10MB.
- Select your options: Choose the garment type (t-shirt, shirt, jacket, etc.) to help the AI understand the expected shape and structure.
- Generate: The AI processes your image and produces a 3D ghost mannequin rendering in seconds. The garment appears as if worn by an invisible form, with natural shape, depth, and drape.
- Download: Save the result as a high-resolution image ready for your marketplace listings, website, or catalog.
The entire process takes seconds instead of 20-30 minutes. There is no second photo shoot, no Photoshop, and no specialized editing skills required. Each generation costs 1 credit.
Upload your garment image and get a professional ghost mannequin effect in seconds. No mannequin, no Photoshop, no waiting.
Create Ghost Mannequin Effect →
Which Garment Types Work Best
AI ghost mannequin technology works best on garments with inherent structure -- fabrics and cuts that hold a defined shape. Here is a breakdown by garment type:
Works very well:
- T-shirts and polo shirts: Cotton and jersey fabrics hold their shape predictably. The AI produces clean necklines, natural sleeve drape, and accurate body form.
- Dress shirts and formal shirts: Collars, cuffs, and button plackets give the AI strong structural cues. Results are consistently sharp.
- Blazers and sport coats: Structured shoulders, lapels, and lining make blazers ideal candidates. The AI renders the tailored silhouette accurately.
- Jackets and outerwear: Denim jackets, leather jackets, bomber jackets, and puffer jackets all produce excellent results due to their rigid structure.
- Hoodies and sweatshirts: The heavier fabric weight and defined hood shape give the AI enough information to generate realistic 3D form.
- Structured dresses: A-line dresses, shift dresses, and other dresses with defined silhouettes work well.
Works with some limitations:
- Lightweight blouses: Sheer or semi-sheer fabrics may not render with perfect depth, but the overall shape is usually accurate.
- Knitwear: Chunky knits work well. Very thin, drapey knits may lose some structural definition.
- Trousers and jeans: Results are generally good, though the leg shape can sometimes appear slightly stiff without a body to conform to.
More challenging:
- Sarees and dupattas: These unstructured, flowing fabrics do not have a predefined shape. The ghost mannequin concept does not translate well because the garment's appearance depends entirely on how it is draped.
- Scarves and stoles: Similar to sarees -- the lack of inherent structure makes 3D rendering unpredictable.
- Very loose or oversized garments: Extremely oversized silhouettes may lose definition because the AI has less structural information to work with.
Tips for the Best AI Ghost Mannequin Results
The quality of your input image directly affects the quality of the ghost mannequin output. Follow these guidelines for the best results:
- Photograph on a clean, contrasting surface: A white or light gray background helps the AI distinguish the garment from the surroundings. Avoid patterned or textured backgrounds.
- Lay the garment flat and symmetrical: Smooth out wrinkles, straighten the collar, and arrange sleeves naturally. The AI uses the flat-lay shape as the basis for its 3D rendering, so a neat layout produces a neater result.
- Capture the full garment: Make sure nothing is cropped or folded under. The AI needs to see the complete outline -- neckline, hem, cuffs, and all edges.
- Use even, diffused lighting: Harsh shadows can confuse the AI about the garment's true shape and color. Natural daylight or a softbox setup works best.
- Shoot at high resolution: Aim for at least 1500px on the longer side. Higher resolution gives the AI more detail to work with, especially for textures and fine stitching.
- Show the garment's true color: Avoid colored lighting or heavy white balance shifts. The AI preserves the colors it sees in the input image.
Ghost Mannequin vs Other Product Photography Styles
Ghost mannequin is one of several common product photography formats. Here is how it compares to the alternatives:
Ghost mannequin vs flat-lay: Flat-lay photos show the garment from directly above, laid out on a surface. They are fast to shoot but do not convey three-dimensional shape or fit. Ghost mannequin adds the depth that flat-lays lack, showing how the garment looks when worn. For structured garments, ghost mannequin is almost always the better choice for primary product images.
Ghost mannequin vs model shots: Model photography shows the garment on a real person, which is excellent for conveying fit, movement, and lifestyle. However, models are expensive, require scheduling, and introduce body-type bias. Ghost mannequin keeps the focus purely on the product. Many brands use ghost mannequin for primary images and model shots for secondary lifestyle images.
Ghost mannequin vs hanger shots: Photographing garments on hangers is quick and easy but looks less professional. The hanger distracts from the garment, and the shape is often less flattering than a mannequin form. Ghost mannequin provides a significantly more polished result.
Building a Full Product Photography Workflow
Ghost mannequin images work best as part of a complete product image set. Here is a practical workflow using CatalogX:
- Start with a flat-lay photo of your garment on a clean background.
- Generate a ghost mannequin image using the CatalogX Ghost Mannequin tool for your primary product listing image.
- Generate an AI model shot using CatalogX's virtual try-on to show the garment on a person for secondary images.
- Remove the background from any generated image using the background removal tool if you need a transparent PNG.
- Export for marketplaces at the correct dimensions for Amazon, Flipkart, or your own store.
This workflow produces a complete set of product images -- ghost mannequin, model shot, and clean background -- from a single flat-lay photo. No studio, no model, no mannequin, no Photoshop.
Frequently Asked Questions
The ghost mannequin effect (also called invisible mannequin or hollow man effect) is a post-production technique that makes a garment appear to be worn by an invisible person. The garment retains its 3D shape, showing neckline, sleeves, and body form, but no mannequin or model is visible. It is the standard for fashion e-commerce because it highlights fit and construction without distracting from the product.
Traditional ghost mannequin editing requires shooting the garment on a mannequin from the front, then shooting the inside labels and neck area separately. A skilled Photoshop editor then composites these shots together, removing the mannequin and filling in the neck joint area. This process typically takes 20 to 30 minutes per image, depending on garment complexity.
Structured garments produce the best results with AI ghost mannequin tools. T-shirts, polo shirts, dress shirts, blazers, jackets, hoodies, and structured dresses all work well because the AI can accurately predict how the fabric holds its shape. Very loose, flowing, or unstructured garments like sarees, scarves, or chiffon blouses are more challenging.
Yes. With CatalogX, you upload a flat-lay photo of your garment and the AI generates a 3D ghost mannequin effect automatically. You do not need to photograph the garment on an actual mannequin first. The AI interprets the flat garment and produces a realistic three-dimensional rendering as if it were worn by an invisible form.
Outsourcing ghost mannequin editing to a professional retouching service typically costs between 2 and 5 dollars per image, with turnaround times of 24 to 48 hours. CatalogX generates the ghost mannequin effect for 1 credit per image (under 1 dollar on most plans) and delivers results in seconds. For catalogs with hundreds of SKUs, the cost and time savings are substantial.